
|

|

|


|
Using the Data Designer |
Group Box ( )
)
A Group Box field lets you group related fields together on a screen by surrounding them with a box and optionally placing a caption above them.
After you insert a Group Box field, to insert other kinds of fields within the box,
- place the cursor inside the box then select a field type button (if you are using the horizontal toolbar)
Advantages of Grouping Fields
One advantage of grouping fields is that you can allow the user in Data Entry mode to add another instance of a group.
For example, if a screen collects several fields of information about each telephone call, the user could simply click the Insert Below button to insert a new group of fields, ready to collect information about the next call.

Another advantage of grouping fields is that you can suppress a group of irrelevant fields. For example, if a screen includes two groups of fields that collect information about hardcover and paperback books, and you are adding information about a hardcover book, you can collapse the paperback book questions because they are not relevant to your current task.
Use the eyeglass icon to expand or collapse the display of fields within a group.
Expanded Group Field with glasses icon highlighted


Dialog Box
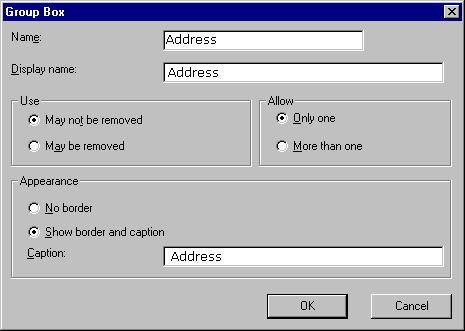
Fields on the Group Box Dialog
| Field |
Description |
|---|---|
| Name |
Enter the name of this field. Note that you cannot enter spaces nor most special characters (!@#$%^&*()+=<>,.:;'"{}[]\|`~) into this field. The Name Field's Default Value By default, the Data Designer assigns a name made up of Field followed by the next available number. So, the first field's default name is Field1, the second field's default name is Field2, etc. You can change the default if you want. |
| Display Name |
Enter the text that appears when a user hovers the cursor over this field. |
| Use |
See The Use Field |
| Allow |
See The Allow Field |
| Appearance |
Click Show border and caption if you want to surround the fields in this group with a box. You can also create a caption to appear in the top line of the box. Click No border if you do not want to surround the fields in this group with a box. |
| Caption |
If desired, enter text to describe this group of fields on the data entry screen. For example 
After you insert this field onto the screen, you can use eWebEditPro+XML's formatting capabilities to modify its size, font, color, and other attributes. Note: The Caption field only appears on this dialog when you create the Group Box field. If you later try to edit the field, the Caption field is not on the dialog. However, you can edit the Caption text within the editor. |
|
|

|
|
|