
|

|

|


|
Customizing Your Toolbar |
Removing Or Adding Menus
To remove or add a menu, follow these steps.
- Place the cursor on the toolbar.
- Right click the mouse.
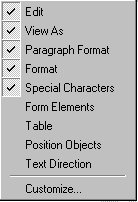
- A dropdown list appears. It displays all menus available to you and the Customize option.
Note
If Customize does not appear on the menu, you are not authorized to customize the toolbar.
Menus that are checked appear on your toolbar.
In the above example, the Special Characters, View As, Format, and Paragraph Format menus appear. The Table, Position Objects and Text Directions menus, which are not checked, are available but do not currently appear on the toolbar.
- To add a menu to your toolbar that appears on the list but is not currently checked, place the cursor on the menu name and click the mouse. A check mark appears, and the menu appears on the toolbar.
To remove a menu from your toolbar, place the cursor on the menu name and click the mouse. The check mark disappears, and the menu no longer appears on the toolbar.
|
|

|
|
|