
|

|

|


|
Using the Data Designer |
Checkbox ( )
)
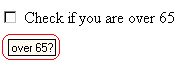
A Checkbox field is only one character wide and accepts one of two possible values: checked or unchecked. For example
Dialog Box

Fields on the Checkbox Dialog
| Field |
Description |
|---|---|
| Name |
Enter the name of the field. Note that you cannot enter spaces nor most special characters (!@#$%^&*()+=<>,.:;'"{}[]|'~) into this field. See Also: The Name Field's Default Value |
| Indexed |
Check if you want to index this field. For more information, see "Indexing the Fields of a Data Design Document" in the Supporting the Data Designer chapter of the Developer Reference Guide. The Indexed field may not appear, depending on how your administrator set up your system. |
| Display name |
Enter text that appears when a user hovers the cursor over this field (circled in red below). 
|
| Default value |
If you want this field to be checked when the screen first appears, click True. Otherwise, click False. |
| Caption |
Enter text to guide the user's response to this field. To continue the above example, the caption would be Check if you are over 65. After you insert this field onto the screen, you can use eWebEditPro+XML's formatting capabilities to modify its size, font, color, and other attributes. Note: The Caption field only appears on this dialog when you create the Check Box field. If you later try to edit the field, the Caption field is not on the dialog. However, you can edit the Caption text within the editor. |
|
|

|
|
|