|

|

|


|
Using the Data Designer |
Plain Text( )
)
Use a plain text field when you want the user to enter an unformatted, free text response.
Note
If a plain text field tries to perform a numerical calculation with a value that is blank or contains letters, NaN appears in the field. (NaN stands for "not a number.") If a plain text field tries to divide by zero, Infinity appears.
Plain Text Field vs. Rich Area Field
The following capabilities are available with a plain text field but not a rich area field.
- You can adjust the field's width by dragging it. See Resizing a Plain Text Field.
- The text can be read-only or hidden
The following capability is available with a rich area field but not a plain text field.
- In Data Entry mode, the user can change the text's format, size, style, etc. along with adding hyperlinks, using eWebEditPro+XML's formatting capabilities.
- You can enter custom tags.
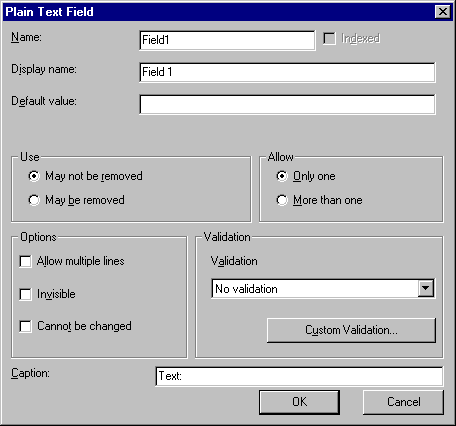
Dialog Box

Fields on the Plain Text Dialog
| Field |
Description |
|---|---|
| Name |
Enter the name of this field. Note that you cannot enter spaces nor most special characters (!@#$%^&*()+=<>,.:;'"{}[]\|`~) into this field. See Also: The Name Field's Default Value |
| Indexed |
Check if you want to index this field. For more information, see "Indexing the Fields of a Data Design Document" in the Supporting the Data Designer chapter of the Developer Reference Guide. The Indexed field may not appear, depending on how your administrator set up your system. |
| Display name |
Enter the text that appears when a user hovers the cursor over this field. |
| Default Value |
If you want to set a default value for this field, enter that value here. The default value appears in Data Entry mode, where the user can accept, change, or delete it. For example, if this field collects a city, and most users enter New York, enter New York as the value. |
| Use |
See The Use Field |
| Allow |
See The Allow Field |
| Options |
Invisible - Check here to make this field hidden in Data Entry mode. This option lets you store unseen information in each XML document. An example might be putting a version number for the data design so that XML documents can be upgraded to newer versions using an XSL transform. Allow multiple lines - Check here to let this text box expand to accommodate the user's input. If you do not check this box, a single line input box appears on the data entry screen to accept user input. A field can be either invisible or cannot be changed -- it cannot be both. Cannot be changed - Check here to make this field read-only. That is, the user cannot insert data into it in Data Entry mode. You might use this option to provide user instructions for completing the screen. |
| Validation |
Select the kind of validation to apply to this field. Your choices are:
Decimal numbers include whole numbers because the decimal point is implied. That is, 12 is 12.0000.
A leading minus sign "-" is allowed. The decimal point must be period (.), even in locales that normally use a comma (,).
For more information, see Custom Validation. If you assign to this field any value other than No validation, the field is initially surrounded by red dashes in Data Entry mode. If the user's response does not meet the validation criterion, the field remains surrounded by red dashes. The system administrator determines whether or not the user can save an invalid document. |
| Caption |
Enter text to describe this field on the data entry screen. It appears to the left of the field. After you insert this field, you can use eWebEditPro+XML's formatting capabilities to modify its size, font, color, and other attributes. Note: The Caption field only appears on this dialog when you create the Plain Text field. If you later try to edit the field, the Caption field is not on the dialog. However, you can edit the Caption text within the editor. |
| Data Style |
Resizing a Plain Text Field
If you insert a plain text field and its width is too small or too large, you can easily resize it. To do so, follow these steps.
- Place the cursor over the field and click. The cursor changes to a four-headed arrow, and small boxes surround the field.
- Move the cursor to the far right of the field. (See illustration below). The cursor turns into a two-headed arrow.


|

|

|

|