
|

|

|


|
Working with HTML Forms |
Inserting Form Elements
To create a form's content block, follow these steps.
- Access the form you created in Creating a New Form.
- lick the Edit button (
 ).
). - The Edit Content window opens.

- If desired, edit the form title.
- Enter the form's fields. By default, the form elements toolbar appears.

The following table explains the form element toolbar buttons.

<form name="Test" action="http://localhost/ewebeditpro4/formtest.htm" method="post"></form>
Note: If this content block is associated with a form, this button is not needed.

<input type="button" value="Test Button" name="Test" />

<input type="Submit" value="Submit Button" name="Submit" />

<input type="reset" value="Reset Page" name="Reset"/>

<input type="hidden" value="This is initial content" name="mycontent" />

<input size="15" value="This is initial content" name="mycontent" />
Note: See Letting the User Override email Values for information about overriding default Forms settings.

<input type="password" size="5" value="" name="mypassword" />

<textarea name="mycontent" rows="5" cols="4" type="textarea">This is initial content</textarea>

<input type="radio" checked="checked" value="This is a radio button" name="mybutton" />

<input type="checkbox" checked="checked" value="This is a check box" name="mycheckbox" />

<select multiple="multiple" size="25" name="myselectbox">
<option value="option1">option1</option>
<option value="option2">option2</option>
</select>

- Move the cursor to the screen position where you want the first field.
- Click the button corresponding to the kind of field you want to insert.
- Complete the dialog box that collects information about the field.
Here is an example of form content that you can create.
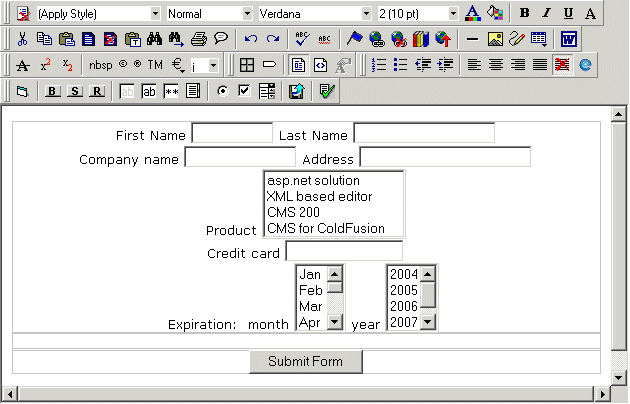
Note that the first four fields use plain text while the fifth uses a select box.
You can apply validation criteria to any field by selecting the field then clicking the Form Validation button ( ). For more information, see Form Validation.
- After you complete the form, you have the following options.
Button or TabDescriptionPostback MessageEdit the summary for content block. If you want to customize the post back message, click the Summary tab. (A postback message informs the user submitting the form that his entry has been completed.) Then, enter a post back message for the form.The postback message can be as long as you want and include images, files, hyperlinks, etc.Edit MetadataEdit the metadata for content block See Also: MetadataScheduleAssign start or end dates, or both, for when content is published to Web site See Also: Scheduling Content to Begin and EndCommentEnter history comment to indicate changes made to content
 SubmitSubmit content block into approval process
 PublishPublish content to Web site.
Note: If a content block has any active tasks, a comments window pops up. You can insert comments to describe how approving or declining the content affects the task.
Note: Only the last approver in the approval chain sees this button.
 Check InSave and check-in content. This button does not submit the content into the approval process, but rather lets other users change it.
 SaveSave the content without submitting it into the approval process.If a user clicks save and then closes the editor, other users cannot edit the content.
 DeclineThis buttons appears if you are the next approver in the approval list. Click it to decline the changes made to the content.
Note: If a content block has any active tasks, a comments window pops up. You can insert comments to describe how approving or declining the content affects the task.
 CancelClose the editor without saving changes.
 - Click the Save and Submit or Publish button (
 ). The form only appears on your Web site after it is published.
Next, the form may need to go through the approval process. When that is complete, add it to the site by assigning it to a page template. The next section explains that procedure.
See Also: Implementing a Form on a Web Page
|
|

|
|
|