|

|

|


|
Working with Calendars |
Accessing the View Calendar Screen
The View Calendar screen collects general information about a calendar, and provides toolbar buttons that let you perform calendar-related activities.
To access the View Calendar screen, follow these steps.
- Access the Modules folder from the lower left corner of the Workarea.
- Click the Calendars folder.
- The Calendar Modules screen appears. It lists all calendars in Ektron CMS400.NET.
Note
Only system administrators can create a new calendar.

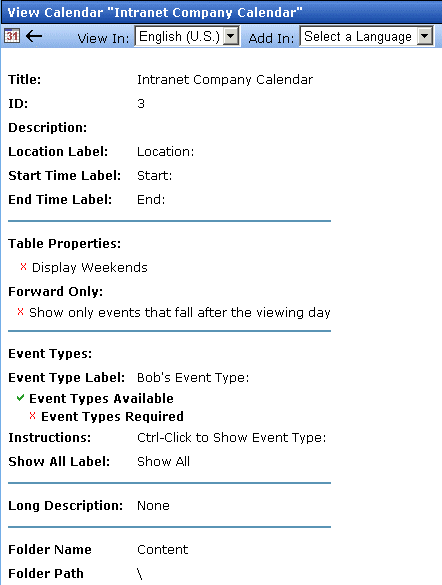
The following table explains the fields on the View Calendar screen.
| Field |
Description |
|---|---|
| Title |
Title given to the calendar. The title identifies the calendar within the Workarea. |
| ID |
ID number automatically assigned to calendar. This is used to display the calendar on a Web page. |
| Description |
Description given to the calendar. |
| Location Label |
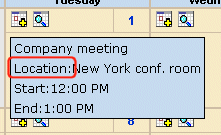
Label for the calendar's location information. This label appears on the calendar when a location is assigned to a calendar event. 
|
| Start Time Label |
Label for the calendar's start time. This appears on the calendar when a start time is assigned to a calendar event. |
| End Time Label |
Label for the calendar's end time data. This appears on the calendar when an end time is assigned to a calendar event. |
| Table Properties: Display Weekends |
A green check (  ) means the calendar displays every day of the week. A red X (
 ) means the calendar displays weekdays only.
 |
| Forward Only |
If a green check (  ) appears next to Show only events that fall after the viewing day, and the user viewing the calendar is not logged in, the calendar only displays events from the viewing date forward. No past events appear.
A logged-in user can view past calendar events. |
| Event Type Label |
Indicates if event types are assigned to this calendar. See Also: Understanding Event Types One section of the Add Calendar Events screen displays available event types and lets the user assign them to the event. 
By default, this text is Event Type:. Your system administrator can edit the text. |
| Event Types Available |
A green check (  ) means you can add event types to the calendar.
 |
| Event Types Required |
A green check (  ) means that when entering a calendar event, you must assign an event type to it.
 |
| Instructions |
If this calendar uses event types, text appears at the bottom of the screen that explains how to use the event type selection box. By default, this text is Select Event Type to View:. 
Your system administrator can change this text. |
| Show All Label |
If this calendar uses event types, the list of event types appears at the bottom of the screen. On top of the list is text indicating that all event types will appear on the calendar. By default, this text is Show All. 
Your system administrator can change this text. |
| Long Description |
Lets the user enter additional text while adding a calendar event. |
| Folder Name |
Name of content folder to which the calendar is assigned for permission purposes. You can only add, edit or delete events for calendars in folders to which you have been granted permission. |
| Folder Path |
Complete path to the calendar's content folder. |
The View Calendar screen may contain the following toolbar buttons that let you perform other tasks.
Button
Name
Description
More Information

View Calendar
Show calendar in the Workarea

Back
Return to previous screen


|

|

|

|