|

|

|


|
Using the Data Designer |
Differences in eWebEditPro+XML
When you use the Data Designer, eWebEditPro+XML changes in the following ways.
Note
The design toolbar and the design mode and Data Entry mode buttons appear only if your site administrator has defined them in the configuration data.
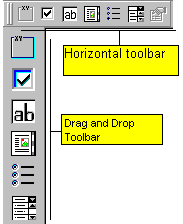
- two toolbars appear, illustrated below. The toolbar buttons let you design the data entry screen. Each button represents a different kind of field.

Both toolbars provide mostly the same buttons. The major difference between them is how you use the button to add a field to the screen. If you are using the horizontal toolbar, place the cursor where you want field, and click the toolbar button.
When using the drag and drop toolbar, drag a button to desired screen location.
Note that a context-sensitive menu, available by right clicking the mouse, is also available to perform the commands. You can right click the mouse then select Insert Field to display a context-sensitive menu of all commands. To edit the properties of any field already on the screen, select the field, right click the mouse, and select Field Properties.
- two buttons appear on the regular (Edit) toolbar: Design mode and Data Entry mode. (For more information, see Design Mode vs. Data Entry Mode.)

The Data Entry mode button lets you preview the screen being created.


|

|

|

|