|

|

|


|
Working with Menus |
Adding a Menu Item
Similar to being able to add, edit, view or delete a menu, Ektron CMS400.NET also allows you to add, edit, view and delete a menu item to a menu. See Also: The Structure of Menus and Menu Items
Adding a Menu Item via Content Folder
To add a menu item via a content folder, follow these steps.
- Navigate to the content folder that contains the menu to which you want to add items.
- Click the View Menus icon (
 ).
). - Click the menu that you want to add items to.
- In the View Language dropdown list, select the language of the menu. See Also: Working with Menus in a Multi-Language System
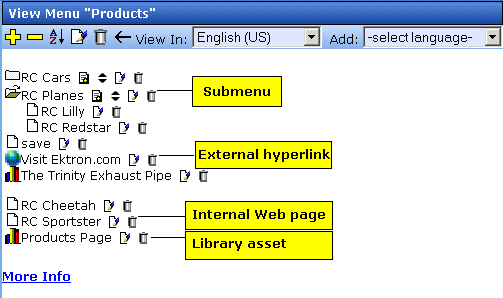
- The Add Menu screen opens, displaying a list of items that can be added to the menu. The following illustration explains the icons on the screen.

- Click the Add Item button (
 ).
). - Use the table below to select a type of menu item and follow the steps to add that menu item.
| Assign this type of content to the menu |
For details, see |
|---|---|
| Content block |
|
| Any library asset: images, files, Quicklinks, hyperlinks to the menu |
|
| External hyperlink |
|
| Submenu to the main menu |
Adding a Menu Item via Menus Module
To add a menu item via the menus module, follow these steps.
- From the left frame of the Workarea, click Modules > Menus.
- Click the menu that you want to add a menu item to.
- In the View Language dropdown list, select the language of the menu.
- Click the Add Item button (
 ).
). - The Add Menu screen displays a list of items that you can add to the menu. Use to the table below to select the type of menu item and follow the steps to add it.
Menu item typeFor more information, seeContent blocksAny library assets: images, files, Quicklinks, hyperlinks to the menuExternal hyperlinksSubmenu to the main menu
Adding a Menu Item via Navigation Link on a Web Page
- Access the Web page that contains the link to display the menu.
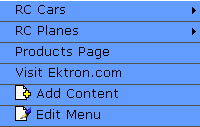
- Place the mouse on the hyperlink that causes the menu to appear.
- The menu appears.

- Click Edit Menu.
- In the View Language dropdown list, select the language of the menu.
- Click the Add Item button (
 ).
). - The Add Menu screen displays a list of items you can add to the menu.
- Use to the table below to select the type of menu item and follow the steps to add that menu item.
| Assign this type of content to the menu |
For details, see |
|---|---|
| Content blocks |
|
| Any library assets: images, files, Quicklinks, hyperlinks to the menu |
|
| External hyperlinks |
|
| Submenu to the main menu |
Adding a Content Block as a Menu Item
To add a content block as a menu item, follow these steps.
- Follow the directions in Adding a Menu Item via Content Folder, Adding a Menu Item via Menus Module, or Adding a Menu Item via Navigation Link on a Web Page.
Note
You can only add content blocks that reside in the menu's content folder or its subfolders.
- Click the circle next to Content Block.
- Click the Next... button.
- The Add New item screen appears, listing all content blocks in the folder (and its subfolders) in which you created the menu.
- Click any folder to display its content blocks.
- Check all content blocks you want to add to the menu.
- Click the Add Item button (
 ).
). - The View Menu screen reappears, showing the new content blocks.
- Click the Edit icon (
 ) next to each new content block to access the Edit Menu Item screen. This screen lets you assign additional information to the menu item, such as the target window. See Fields on the Add/Edit Menu Screen.
Adding a Library Asset as a Menu Item
To add a library asset as a menu item via a content folder or menus module, follow these steps.
- Follow the directions in Adding a Menu Item via Content Folder, Adding a Menu Item via Menus Module, or Adding a Menu Item via Navigation Link on a Web Page.
- Click the radio button next to Library Asset option.
- Click the Next button.
- The Library screen opens.
- Navigate to the folder whose assets you want to add.
- In the right frame, select the type of asset to insert (image, hyperlink, etc.).
Note
To insert assets, the menu's folder must contain library assets. However, you can insert library assets from other folders for which you have permission.
- Select a library asset and click the Insert button (
 ).
). - The Add New Item screen appears. Use the following table to complete that screen.
Adding an External Hyperlink as a Menu Item
To add an external hyperlink as a menu item via a content folder or menus module, follow these steps.
- Follow the directions in Adding a Menu Item via Content Folder, Adding a Menu Item via Menus Module, or Adding a Menu Item via Navigation Link on a Web Page.
- Click the circle next to External Hyperlink.
- Click the Next button.
- The Add New Item screen is displayed.
- Complete the fields as needed.
FieldDescriptionTitleTitle of the new external hyperlink menu item.URL LinkThe URL link for the external hyperlink. For example, www.google.com.
- Click the Save button (
 ).
).
Note
When adding an External Hyperlink menu item, the URL does not get added to the library nor is an ID assigned to it. So, when you save the menu item, it is not added to the CMS database nor can it be retrieved for future use.
Adding a Submenu as a Menu Item
To add a submenu as a menu item via content folder or menus module, follow these steps.
- Follow the directions in Adding a Menu Item via Content Folder, Adding a Menu Item via Menus Module, or Adding a Menu Item via Navigation Link on a Web Page.
- Click the radio button next to Submenu.
- The Add Menu screen is displayed.
- Complete the fields using Fields on the Add/Edit Menu Screen as a reference.
- Click the Save button (
 ).
).
Adding an Item to a Submenu
- From the left frame of the Workarea, click Modules > Menus.
- Select the menu.
- Find the submenu to which you want to add items. (Submenus have a folder icon (
 ) next to them.)

- Click the Add Item icon (
 ) next to the submenu.
 - The Add Menu screen opens, displaying items you can add.
- Refer to the table below for selecting a menu item and follow the steps to add it.
| Assign this type of content to the menu |
For details, see |
|---|---|
| Content block |
|
| Any library asset: images, files, Quicklinks, hyperlinks to the menu |
|
| External hyperlink |
|
| Submenu to the main menu |


|

|

|

|