|

|

|


|
URL Aliasing |
Assigning a Manual URL Alias
There are two ways to manually assign an alias.
- Use the Page Name Maintenance screen. This method is for administrators only.
- Use the Alias tab in View Content area of the content block. This method can be used by content editors or administrators.

Each method is explained below.
Adding a Manual Alias via the Page Name Maintenance Screen
Note
Make sure you have enabled URL Aliasing and given the administrator's group permissions for aliasing. For information on Enabling URL Aliasing, see Benefits of Manual URL Aliasing. For information on User Group Permissions, see Viewing the Users in a User Group.
- Go to Workarea > Settings > Configuration > URL Aliasing.
- Click the Page Name Maintenance button (
 ).
). - The Page Name Maintenance screen appears.

| Field |
Description |
|---|---|
| Alias |
The URL as it appears aliased. |
| Actual |
The actual URL before aliasing. |
| Content Title |
The title of the content block. |
| Status |
The status of the content block. For more information on content block status, see Content Block Status. |
| ID |
The content block's ID number. |
| Lang ID |
The language code for the content block. See Also: Appendix A: List of Supported Languages |
| Primary |
The alias a content editor sees when editing an alias via the Alias tab. See Also: Adding a Manual URL Alias via the Alias Tab  = Primary Alias for that URL
 |

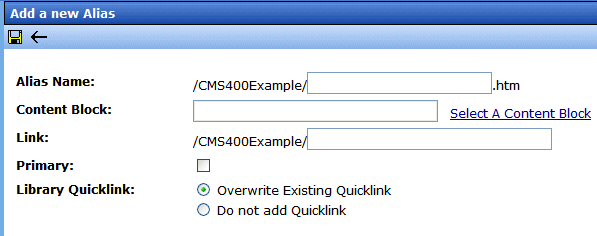
- In the Alias Name field, choose the name you want to use for an alias.
- Click on Select a Content Block to choose a content block.
- The QuickLink Select window appears.
- Choose a content block.
- Check the Primary box if you want to make this the primary alias.
- Choose a Quicklink option.
Warning!
When you choose to overwrite an existing Quicklink, you permanently delete it. There is no way to revert back to the old Quicklink. If you want to use the old Quicklink again, you need to add a new one. For more information on creating Quicklinks, see Ektron CMS400.NET User Manual > "Library Folder" >"Quicklinks."
Adding a Manual URL Alias via the Alias Tab
Note
Make sure you have enabled URL Aliasing and given the administrator's group permissions for aliasing. For information on Enabling URL Aliasing, see Benefits of Manual URL Aliasing. For information on User Group Permissions, see Viewing the Users in a User Group.
On the Alias tab, Alias Name has the message, [Not Defined]. There are two reasons this message appears:
- No alias is defined
- An alias is defined in Page Name Maintenance, but it is not set to be a primary alias
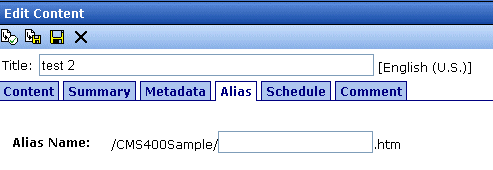
- In the Workarea, click the content block you want to work with.
- Click the Edit button (
 ).The Edit Content screen appears.
- Click the Alias tab.
- In the Alias Name field, enter the name you want to use for an alias.
- Save and publish the content block.
Note
An alias goes live only after the content block is published.


|

|

|

|
 ). The Add a New Alias screen appears.
 ).
).